A No-Huddle System for the Wing-T

I’ve been running no huddle with my youth teams for the past two years with success. We mimic what Sherwood High School does so I have to give credit to offensive coordinator Jason Travnicek for this approach. While we are a Wing-T team, what I’m going to talk about here is applicable to any youth football team.
There are many reasons why you might want to run no huddle, and I need to be very clear about why we chose to do it and what benefits it brought. Also, we use a particular approach that has significant limitations but can also solve some serious issues (and open doors) and I’ll call out those trade-offs.
So what are some reasons to run no huddle with your youth football team?
- You can run hurry up / two minute style offense the entire game, with your entire playbook
- Even more importantly than #1, you can control the tempo of the game and run at the speed you want to run. The threat of running hurry up is sometimes just as important as actually doing it.
- If implemented well, you can minimize the chance for misunderstanding and miscommunication.
- You can save practice time by not having to worry about teaching a huddle technique.
- You can increase reps in practice by not having to use a huddle.
- If you use the approach I’m about to talk about, you can greatly simplify the teaching of the offense and position-specific rules. The Wing-T can be very difficult to teach and install, especially for the offensive linemen. When you introduce multiple formations, motions, and shifts, it can become even more confusing.
Our Approach: Position Specific Wrist Coaches
About five years the high school had a running back that had difficulty remembering play direction and assignments based on the call in the huddle. In classic football-coach-as-innovator style, Jason designed a system that put the play and position assignment right on the wrist coach while still allowing for flexibility in how the play would be called.

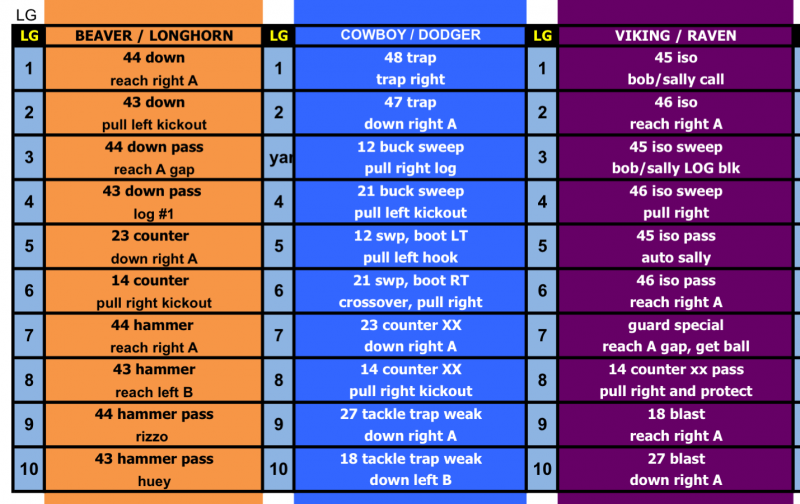
Above you see one of the wrist coach panels from my prior season for the left guard. If we call “Beaver 1”, “Longhorn 1”, or “Orange 1” the play will be 44 Down and the LG assignment is to “reach right A”. This means he executes a reach block to the right A gap (duh). If we call “Beaver 2” we are running the down play to the left and he now will pull (actually trap) left and kick out.
For my teams with 12–13 year olds, we would typically start the first half of the season with just one of these panels, adding a second panel to expand our playbook about midway through. This year was a bit different as we had a good idea from the start what our full playbook would be so I went ahead and put in both panels from the start.
It doesn’t take a genius to see how this can dramatically reduce the time to install the base plays as well as variations. We even include instructions for the TE for when he is play-side vs. back-side (e.g., we will run sweep plays to the TE or WR side) so he has less to remember.
How We Call Plays
Our approach to calling plays from the sideline was as follows:
- Our head coach and offensive coordinator is the play caller and has a call sheet that I produced for him each week. It is close to a mirror of the wrist coaches with additional information such as go-to short yardage plays as well as snap count clues (more on that in a second).
- The play caller yells out the formation and motion. We don’t try to disguise this at all as we felt that hiding the formation call just didn’t make much sense. We could always tag the formation call if we wanted a pre-snap shift. For example, we could say “Rose Lightning Madden” if we want to start with a pre-snap Left formation, shift to Rose, then run our jet motion to the left. We kept it simple and would always have a designated shift-from formation (usually opposite in some fashion from the final formation).
- As soon as the formation is called, the players are getting aligned and set: the wide receiver (split end) is getting his alignment, TE is moving to the proper side, etc.
- The play caller then yells out the play call, e.g. “Cowboy 7” or “Viking 9”. We have multiple options for how we call each column on the wrist coach so we believe it is very unlikely for a team to scout out our signals. More on that in a bit though.
- Finally, the play caller gives a tag to indicate the snap count. We keep things simple and go on 1 or 2 and you just come up with an easy way to call it. For example you might call out a Pac 12 team for snap count 1, SEC team for snap count 2.
So a full example might looks like this, assuming “Niner 5” is our 28 Jet Sweep play:
Lily Razor, Niner 5, Trojans
This is a weak-side (because in Lily the TE is on the left, razor motion puts the left wingback in jet motion to the right) jet sweep play on 1.
Downside of this System
This system isn’t perfect and has some downsides:
- It is a lot of work for the coaching staff to produce these wrist coaches. The first season I implemented this, I was reprinting all of the wrist coaches about every two weeks. I have a laminator, paper cutter, and color printer at home and it would still take about 2 hours to do the entire set for 25 kids. Fortunately this season, other than a few times I had to make small corrections on a specific position, I only had to redo the entire set once.
- The biggest concern I have is this: this system will limit your ability to go hurry up. You can only go so fast when every player needs to get the call, then look down at their wrist coach to get the play and assignment. With this system you are trading time for ease of teaching.
- It can be difficult to introduce nuance variations on formation and rules that might otherwise be easier to teach. Because you are fixing the rules and play call names into discrete buckets, you will be constrained by those rules even when a single player shift in position or rule could be easy to implement.
In my next post I’m going to talk about an alternative approach to this no-huddle system which takes away these limitations but also loses the teaching benefits.